
Thanksgiving (Paper Bag) Tree
Last week I got to teach our Sunday School class how to make this pretty cool Thanksgiving paper tree. I must admit after making it with them, I told my husband that I would like for us to add this to our family tradition. I think it makes an awesome family activity.
Our church office has a pack of these paper lunch bags that I have been using in some of my craft projects with the kids. The last time I used it, we made some puppets out of it.
Originally I was thinking of using twigs for this craft, but I wasn’t sure if I will be able to collect enough twigs to fill a jar per kid. The thing about our Sunday School class is you just never know how many kids you will end up having. So I want to be prepared in case I ended up with a big class.
Since I know we have plenty of these paper lunch bags, I went ahead and worked on a sample to show the kids. It was my first time to make this myself. I was pretty impressed by how easy it is to make this and how authentic it looks.
It really looks like a miniature tree and all you need is one bag!
The bigger the bag, the bigger is your tree! So don’t throw those brown paper bags from your Mary Brown’s take out if you wish to make this project without spending a dime on paper bags. Mind you, if you have to, they are pretty inexpensive. You can get a bunch of them at the dollar store for a dollar.
Here’s how you can make them:
With the base of the paper bag folded, cut down the center of the 4 sides of the bag up to the folded base.
Twist the bag and then untwist. Don’t skip this process as this makes it easier to manipulate the bag into a tree form after.
Twist the base of the bag up to the slits you first made. This is your tree trunk. Cut 2 short snips in the opposite sides of the base to open it up a bit. This helps your tree to stand on its own.

Starting from the base of your 4 cuts, twist them about halfway up. These would be your 4 major branches.

Then cut lengthwise down the bag to where the branch is twisted. Make 1 or 2 cuts and twist each section. For more branches, you can make 3 or more cuts.
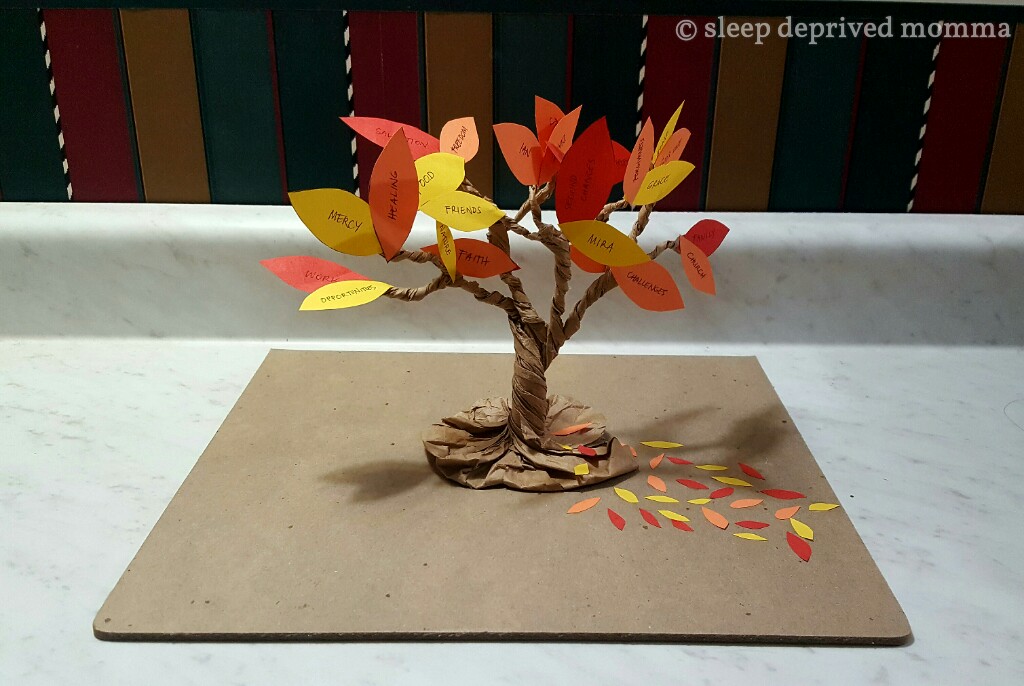
(Like I said earlier, this tree is free standing. So you have an option of leaving it as is, or you can hot glue the base of your tree to a cardboard like I did which allowed me to glue cut out fallen leaves on the cardboard for a more artistic effect).
Cut out different coloured leaves. I used yellow, red and orange. And I made my own leaf template of 2 different sizes and printed them out. I opted for the regular leaf design for easy cutting since I am making this project with kids. But you can go ahead and use different kinds of leaves. (Maple leaves would look really pretty on this tree, but it means a lot of intricate cutting. If you have a leaf hole punch you will breeze through this process and will be done in no time! Unfortunately, I don’t. But with a simple leaf like I used, it was pretty easy to cut. You can even skip printing a template and just cut away. But if you are working with kids, it will be easier for them to have a template to follow. One more tip: If you don’t have coloured papers, you can use your grocery flyers!).
Talk about what you are thankful for and write them down on the leaves, and then glue the leaves on your branches.
Optional: Using the scrap papers, cut some small leaves and glued them on the cardboard base for a more Fall-ish look. And voila! A stylish Thanksgiving tree that you can use as a centerpiece to remind you and your family of what Thanksgiving is really all about.

I hope you’ll have fun making this as much as we had!
Happy Thanksgiving! 🙂